Thursday, 29 May 2014

Three!

Today, exactly three years ago I held Little T for the very first time in my arms. When I think back to that first moment we shared together, it feels impossible to think that so much time has already passed since that day and yet, somehow it also feels impossible to think that he has not been a part of my entire life.


My first meeting with Little T was delayed by a whole day after he was born as he had to be rushed off to the NICU and I had to recover from the surgery and shock. He had a very scary entry into the world and for the first few minutes there we weren't sure if he was going to make it at all. It's a day I both do and don't want to remember. Luckily, now three years later I can look at the healthy, happy, clever, funny and ever growing boy that he is becoming and celebrate that day with him, creating lots of happy memories for him to look back on.

Like so many other boys, Little T loves his cars, trains and aeroplanes, but this year he has also become very interested in dinosaurs and for the last month and a half he has been asking me for a Dinosaur Birthday. With most of our family living in other countries and most of his little friends still living in London, it was going to be just the three of us this year to celebrate the day. Still, I filled the living room with dinosaur balloons, wrapped his presents in dinosaur wrapping paper and made him dinosaur shaped pancakes (with sprinkles) for breakfast. It really was a special moment when he came downstairs, saw everything and realised that it's all for him :)


The morning was spent ripping open presents, playing with new toys, trying and finally succeeding in assembling all the bits requiring assembly and talking with far away family on Skype. After all of the excitement of it all (and the very early start to the day) Little T went off for a little nap, which gave me the time to turn my attention to the most asked for part of the day, the Cake!


After trying my hand at elaborate cake decorating previously and not quite achieving the desired results, I knew it would be best to take a much more simple yet effective route this year. Many, many hours of Pinteresting confirmed this notion and so the idea was born. A fool-proof chocolate cake, covered in thick ganache icing, a couple of packs of chocolate finger biscuits stuck round the sides, big sprinkles (a.k.a dino eggs) scattered over the top and the finishing touch, a few favourite dinosaur toys (artfully) placed around. The end result was one I was very pleased with and Little T was absolutely ecstatic when he saw it coming out of the kitchen with candles all lit.

All round, it was a fun filled and joyous day to celebrate the fact that we have had the privilege of raising this little boy for three years already and to look forward to so many more years to come :)

Wednesday, 14 May 2014

Country Living


Even after living in the UK for nearly eleven years, I am still often blown away by the beauty that the English Countryside has to offer. People travel far and wide across the globe to see spectacular sights, but sometimes you can be very pleasantly surprised at what there is to see in your very own little corner of the earth.


Over the weekends, we try to get out and about as much as possible and try to see as much of our new surroundings as possible. A couple of weekends ago this led us to the gorgeous New Forest in Hampshire, a place that still truly feels wild and untamed. Although it was very wet and muddy after all of the rain we've had over the last several months, it was an extremely enjoyable day out, with some awesome views all around.


Luckily the sky stayed blue for the entire day and with the sun on our faces and our backpacks full of snacks we set off to find the wild horses that roam around this forest.


We walked for miles and miles that day, trying to see more and more of this stunning place, but in the end we had to call it a day and return home when the sun started to dip below the horizon. There is still much of the forest that we weren't able to explore that day, so I am certain that we'll go there again soon.


Luckily for me though, coming home doesn't mean that I am stuck in a big city any more and the countryside is just a stone's throw away from me now. So, on a day like today, when the sun is shining bright in a clear, blue sky, I can just jump on my bicycle with Little T on the back and head down this lovely little country lane.


Within minutes I am in open fields, covered in buttercups and heading towards a little forest that's on top of a very steep hill.


Along the way I was able to indulge in one of my greatest little pleasures, dandelion seeds!!!


There's nothing quite like fresh air, open space and some exercise to keep a toddler happy, Little T had the biggest smile on his face the whole day. Then again, it may just have been because he got to wear his new Lightning McQueen hat :)


Oh, and of course because of all the little lambs we saw along the way!


Wednesday, 7 May 2014

Toddler Baking

One of the best things about having children is seeing yourself in them. Over the past three years I have come to notice that Little T has my eyes, my nose, my silly sense of humour, my love of animals, my total lack of patience and most recently I have seen that he also has my love of baking.


Every few days, as soon as Little T wakes up his first words to me will be, "I want to make pancakes". As a result I can whip up a batch of pancake batter pretty much with my eyes still closed, and that's with the help of a toddler. The real challenge for me comes on a day like today when he asks to bake cake. For me, baking has always been about order, precision and processes, but since adding a toddler into the mix, I have had to learn to change the way I bake. I have now learnt (the hard way) that simple is definitely better and the less ingredients and steps there are, the better your chances of success. My go-to book is still from the queen of easy baking, Nigella Lawson's How to be a Domestic Goddess and today I settled on a plain and simple Madeira cake.


I have also had to learn to just let go and to embrace the ensuing chaos, mess and extra spoons, spatulas and fingers that will end up in the batter. So what if more egg and flour ends up on the counter than in the bowl, it's all part of the process now! Oh, and I no longer worry about the unavoidable Licking of the Spoon, I just make sure I use good, fresh, organic eggs and that the spoon only goes back into the bowl once the cake is in the oven :)


In the end, the cakes my not be pretty and they may not rise to dizzying heights, but they taste pretty darn delicious and most important of all is that we had fun baking them!


Now, if only Little T had some of his father's patience and could wait until the cake has cooled down before trying to dig in...


Tuesday, 29 April 2014

Flower Cushion Square - How To

I thought that as I'm sort of starting anew with my blog, that I would also try my hand at writing a tutorial for the little flower square that I had designed for my new cushion.


The square is probably not completely unique and there my very well be another pattern just like it out there, but this is how I did it.

I worked up these squares using a DK cotton yarn on a 4mm hook and the finished square measures about 7cm on each side. The pattern is written in UK terms using the following stiches:


Chain - ch
Slip Stich - sl st
Treble - tr
Half Treble - htr
Treble 2 together - tr2tog (instructions to follow)

To begin: ch 4, sl st to join into a ring. You will be working into the centre of this ring.

Round 1: To create your first stitch, ch 3, then work 1 tr into the centre of the ring. This will be your first little cluster. Ch1, then work a tr2tog into the ring, here's how: yarn over, insert hook through centre of ring, yarn over, pull up a loop (3 loops on hook), yarn over and pull through 2 loops (2 loops left on hook). Then yarn over and insert hook through centre of ring again, yarn over, pull up a loop (4 loops on hook), yarn over and pull through 2 loops (3 loops left on hook), yarn over and pull through all 3 loops.

3 Loops left on hook

Yarn pulled through all 3 loops to finish stitch

Once you have made your second cluster, ch1 and then make 6 more of these tr2tog clusters, separating each with a ch1. To finish this round, sl st to the 3rd chain of the ch3. You need to end up with 8 little clusters, with a ch1 between each. Cut off your yarn, leaving a tail to sew in later and pull through the loop to tie off.

Completed first round with 8 clusters

Round 2: You will now be working into the ch1 spaces of the previous round. To begin you need to join in a new colour yarn. You can do this any way that works for you, but I find the most secure way is to make a slip knot in your new yarn, as you would to start a foundation chain. Then insert your hook through the ch1 space of Round 1 and then insert hook through slip knot of new yarn - like this 

 Hook inserted through ch1 space and slip knot in new yarn 

Now pull up your first ch1 with your new yarn to secure it to your work - like this 

New yarn secured to work with ch1

OK, to carry on with this round, ch 2 (to make your ch3) and then work 1 tr, ch1, tr2tog, ch1 all in the same ch1 space where you joined your new yarn. This will create your first petal.

First petal stitch

Into your next ch1 space work, tr2tog, ch1, tr2tog, ch1 to make your second petal.

Second petal stitch

Work six more of these "petals" (tr2tog, ch1, tr2tog, ch1) into each of the next ch1 spaces, you should therefore end up with eight petals and sixteen ch1 spaces in total. To finish the round, sl st to the 3rd chain of the ch3, cut off yarn and tie off.

 Completed Round 2

Round 3: You will again be working out of the ch1 spaces from the previous round. You need to join in a new colour, making sure to join in a ch1 space that is between two of the "petals" - like this

Joining new yarn between two "petals"

To begin, ch3, 2 tr, ch2, 3 tr into the same ch1 space where you joined your new yarn, this will create your first corner. 

First corner worked

In the next ch1 space (in the centre of your "petal"), work 3 htr, then in the next ch1 space (between the "petals"), work another 3 htr, and again in the next ch1 space (in the centre of the "petal") work another 3 htr, this will create your first side. NOTE: there are no ch1 spaces between the 3 htr clusters

3 htr clusters worked in ch1 spaces

In the next ch1 space (between "petals"), work 3 tr, ch2, 3 tr to make your second corner.

Second corner worked

Then repeat the 3 htr into each of the next three ch1 spaces just like before, then another corner (3 tr, ch2, 3 tr)  into the next ch1 space after that. Repeat this once more (3 htr into next three ch1 spaces, 3 tr, ch2, 3 tr into last ch1 space) and this should create your little square. Sl st into 3rd chain of ch3 to complete the round, cutting off yarn and tie it off.

Completed square

Now all you have left to do is sew in your ends and make many, many more squares to make your cushion cover, or whatever else you want to. If you find that your square curls up too much, you can either try to steam block it out, or try to crochet a bit looser, by pulling up longer loops in your stitches.

I hope that all of this makes sense, please feel free to leave me a comment if you have any questions and I will try my best to answer it :)

Monday, 28 April 2014

Hello?????

Yeah, yeah, I know... It has been a VERY long time since you've seen or heard anything from me. True to from, when life got busy, my blog got left behind. Nothing new there then :) There are however lots of things that are new in our lives. P had an accident and got a new (metal) cheek, he also got a new job and this meant that we had to move to a new house, in a new town in a new part of the UK. So here I am, back to blogging, now from Oxfordshire.


Everything happened rather suddenly for us after Christmas and in the middle of the terrible floods, we had to find a house in a town a hundred miles away and move in within a couple of weeks. It goes without saying that it was a stressful and chaotic time, but as the old saying goes, all's well that ends well. We are now settled and happy in this new chapter of our lives, and hopefully we will be here for many years more.

I was sad to leave my river view behind at our old house, it was especially amazing just before we moved with all of the flooding. This was one of the last photos I took there.


Luckily though, our new home also offers some spectacular photographic opportunities and the surroundings really came into their own with the arrival of Spring.


Blossoms and tulips and new leaves on trees, I can wax lyrical about this time of year, but I'll let the pictures do the talking for me :)


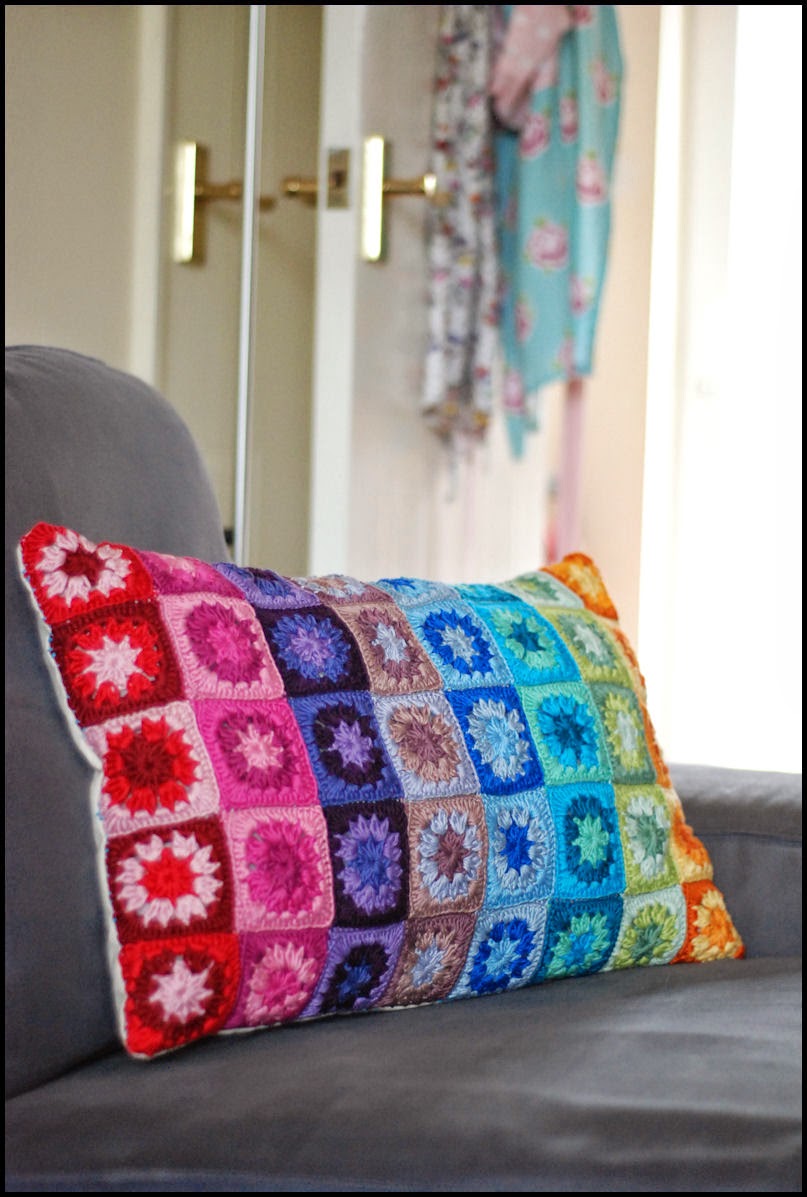
I couldn't let all of this natural beauty go to waste and not let it inspire something new for my home, and thus the flower cushion was born.


It all started with designing a square that resembled these happy flowers on my windowsill. Once I got the design right, I carried on to make lots and lots of lovely little squares, in all of the colours of the rainbow.


I made forty of these rainbow beauties in total. 


Inevitably I had to do quite a lot of sewing in of ends and of sewing the squares together to finish the cushion cover, not one of my favourite things, but luckily I had a very pretty spot to do this in.


And, in the end all of that hard lovely work was well worth it, for now I have a very happy cushion to go in my new happy house :)


Monday, 9 December 2013

Christmas in Colour

There is no escaping the fact, Christmas really is only two weeks and two days away, and personally I can't wait :)


I love the build up and preparations that go along with Christmas and thoroughly enjoy getting the house to feel more and more festive as the big day comes closer. This has been especially true since having Little T, as Christmas is just so exciting when seen through the eyes of a child, reminding you of what really makes this time of the year special.


Last Christmas was a slightly stressed and rushed affair with us making the big move from London to the countryside, and I didn't have much time to make too big a deal of the decorations. This year though is a whole different story :) This year I want Christmas to be as bright, colourful and happy as possible, and so I got started nice and early on some lovely Granny Twinkle stars to hang around the house.


These starts have their own bit of magic. They start out all curled into themselves, looking like fallen leaves. Then with the help of a few pins, a can of Spray Starch and a bit of patience, they become happy, pointy little stars!


I made eighteen in total, each a different colour and have hung them, along with some tiny, shiny baubles, on the shelves in our living room. I have to admit that I am very much in love with this slightly quirky garland.


I also wanted to add some colour to my rather traditional red and white Christmas tree decorations. I bought some more colourful baubles, but I had bigger plans than that.


With inspiration from blogland, I made a few big eyed owls and jewel coloured birds to hang in the branches of our tree.


The pattern for this little guy and his other owly friends can be found on the lovely blog Hopscotchlane and they are an absolute joy to make.


The little birdies are my interpretation of Lucy's, filled with toy stuffing and they make me and Little T smile every time we look at our tree.

I have a few more colourful ideas floating around in my head, but more on that on a later date :) First, I have to go bake some of my Festive Cookies!